
Written by coh at home
[Maixbot]딥러닝 모델 실습 본문
K210 chip의 storage구조를 살펴보자

0 ~ 0x300000 까지는 기본적인 firmware 데이터로 ADC, PWM, Timer, LCD 등등의 기능이 들어있다.
~0xD00000까지는 딥러닝 모델을 넣을 수 있는 공간
~0xffffff 까지는 custom memory로 컴퓨터로 따지면 heap 영역으로 생각하면 될거 같다.
여기까지가 flash 메모리로 non-volitile 하다.
이후 딥러닝 모델을 삽입하는 방법은 k-flash를 사용하여 이루어진다.
이미 만들어진 딥러닝 모델을 임베디드 시스템에 올려서 실습해보자.
1. Mnist
import sensor,lcd,image
import KPU as kpu
lcd.init()
sensor.reset()
sensor.set_pixformat(sensor.RGB565)
sensor.set_framesize(sensor.QVGA)
sensor.set_windowing((224, 224))	#set to 224x224 input
sensor.set_hmirror(0)				#flip camera
task = kpu.load(0x300000)			#load model from flash address 0x200000
a=kpu.set_outputs(task, 0, 10,1,1)
sensor.run(1)
while True:
    img = sensor.snapshot()
    lcd.display(img,oft=(0,0))		#display large picture
    img1=img.to_grayscale(1)		#convert to gray
    img2=img1.resize(32,32)			#resize to mnist input 32x32
    a=img2.invert()					#invert picture as mnist need
    a=img2.strech_char(1)			#preprocessing pictures, eliminate dark corner
    lcd.display(img2,oft=(240,32))	#display small 32x32 picture
    a=img2.pix_to_ai();				#generate data for ai
    fmap=kpu.forward(task,img2)		#run neural network model
    plist=fmap[:]					#get result (10 digit's probability)
    pmax=max(plist)					#get max probability
    max_index=plist.index(pmax)		#get the digit
    lcd.draw_string(224,0,"%d: %.3f"%(max_index,pmax),lcd.WHITE,lcd.BLACK)
    print(max_index)
2. Face detection
import sensor, image, lcd, time
import KPU as kpu
import gc, sys

def lcd_show_except(e):
    import uio
    err_str = uio.StringIO()
    sys.print_exception(e, err_str)
    err_str = err_str.getvalue()
    img = image.Image(size=(224,224))
    img.draw_string(0, 10, err_str, scale=1, color=(0xff,0x00,0x00))
    lcd.display(img)

def main(model_addr=0x300000, lcd_rotation=0, sensor_hmirror=False, sensor_vflip=False):
    # camera init
    try:
        sensor.reset()
    except Exception as e:
        raise Exception("please check hardware connection, or hardware damaged! err: {}".format(e))
    sensor.set_pixformat(sensor.RGB565)
    sensor.set_framesize(sensor.QVGA)
    sensor.set_hmirror(sensor_hmirror)
    sensor.set_vflip(sensor_vflip)
    sensor.run(1)

    # LCD init
    lcd.init(type=1)
    lcd.rotation(lcd_rotation)
    lcd.clear(lcd.WHITE)

    anchors = (1.889, 2.5245, 2.9465, 3.94056, 3.99987, 5.3658, 5.155437, 6.92275, 6.718375, 9.01025)
    try:
        task = None
        task = kpu.load(model_addr)
        kpu.init_yolo2(task, 0.5, 0.3, 5, anchors) # threshold:[0,1], nms_value: [0, 1]
        while(True):
            img = sensor.snapshot()
            # 얼마나 걸렸는지 체크하기 위한 변수
            t = time.ticks_ms()
            objects = kpu.run_yolo2(task, img)
            t = time.ticks_ms() - t
            if objects:
                for obj in objects:
                	# 찾은 object에 사각형 그리기
                    img.draw_rectangle(obj.rect())
                    print(obj.rect()[1]) #obj dictionary is not class  rect()[0] : x [1] : y
            img.draw_string(0, 200, "t:%dms" %(t), scale=2)
            lcd.display(img)
    except Exception as e:
        raise e
    finally:
        if not task is None:
            kpu.deinit(task)


if __name__ == "__main__":
    try:
        main( model_addr=0x300000, lcd_rotation=0, sensor_hmirror=False, sensor_vflip=False)
        # main(model_addr="/sd/m.kmodel")
    except Exception as e:
        sys.print_exception(e)
        lcd_show_except(e)
    finally:
        gc.collect()
yolo2는 object detection에서 인식률도 높고 compact한 모델이다.
face detection의 기술서
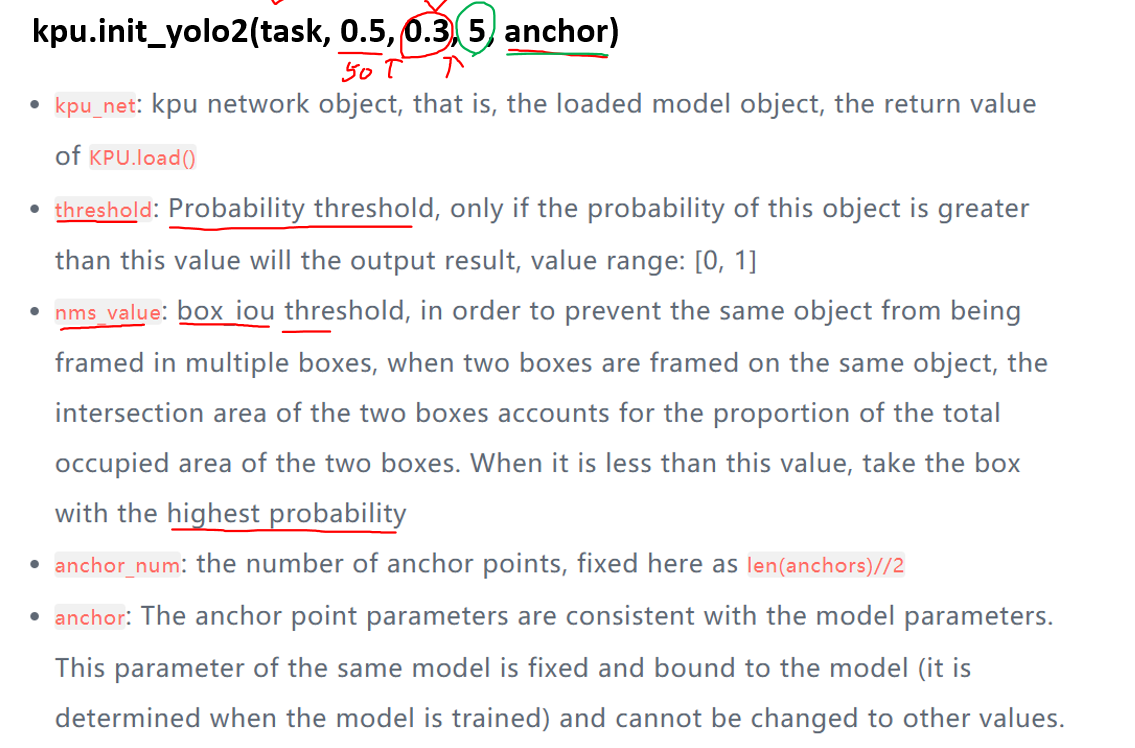
4,5 parameter를 먼저 설명하겠다. anchor는 예를 들어 face detection할 때 anchor box가 이미지를 돌아다니면서 찾게 된다. 근데 anchor box가 너무 작게 된다면 사람 얼굴은 절대 찾지 못하게 된다. 따라서 anchor의 width와 height를 정하고 그런 box를 5개 결정하겠다는 의미이다.
3. Object detection
face detection과 마찬가지로 yolo2 모델을 쓴다.
import sensor,image,lcd,time
import KPU as kpu

lcd.init(freq=15000000)
sensor.reset()
sensor.set_pixformat(sensor.RGB565)
sensor.set_framesize(sensor.QVGA)
sensor.set_vflip(0)
sensor.run(1)
clock = time.clock()
classes = ['aeroplane', 'bicycle', 'bird', 'boat', 'bottle', 'bus', 'car', 'cat', 'chair', 'cow', 'diningtable', 'dog', 'horse', 'motorbike', 'person', 'pottedplant', 'sheep', 'sofa', 'train', 'tvmonitor']
task = kpu.load(0x500000)
anchor = (1.889, 2.5245, 2.9465, 3.94056, 3.99987, 5.3658, 5.155437, 6.92275, 6.718375, 9.01025)
a = kpu.init_yolo2(task, 0.5, 0.3, 5, anchor)
while(True):
    clock.tick()
    img = sensor.snapshot()
    code = kpu.run_yolo2(task, img)
    if code:
        for i in code:
            a=img.draw_rectangle(i.rect())
            a = lcd.display(img)
            for i in code:
                lcd.draw_string(i.x(), i.y(), classes[i.classid()], lcd.RED, lcd.WHITE)
                lcd.draw_string(i.x(), i.y()+12, '%f1.3'%i.value(), lcd.RED, lcd.WHITE)
                print(classes[i.classid()])
    else:
        a = lcd.display(img)
a = kpu.deinit(task)
사실 flow 는 face detection과 같다.
'Advanced > Maixbot Project' 카테고리의 다른 글
| [Maixbot]프로젝트 (0) | 2023.07.12 |
|---|---|
| [Maixbot] camera & LCD (0) | 2023.07.10 |
| [Maixbot]Analog output (0) | 2023.07.10 |
| [Maixbot]Analog IO (0) | 2023.07.10 |
| [Maixbot]AI concept review with CNN (0) | 2023.07.07 |
'Advanced/Maixbot Project' Related Articles
more


